2016년 12월 8일 목요일

Subcontracting Process & SAP Solution


[출처 : https://www.linkedin.com/ ]

Subcontracting Process & SAP Solution

Most manufacturers prefer to manufacture an entire product in house.Still Subcontracting is considered to be an useful procurement alternative due to various reasons. Advantage for the Prime Contractor if produced in House:
  • To assume greater control over the manufacturing processes
  • Sharing of proprietary information is not required
Advantages of Subcontracting:
  • Evaluation of Make and/or Buy decision is very important consideration
  • Lower Procurement Cost
  • Prime Contractors Lack of Competency to produce product in house
  • Prime Contractors Lack of Capacity to produce product in house
Purpose of Subcontracting Process:
Subcontracting process involves sending raw components to a vendor for specific manufacturing processes and receiving the value-added finished material back into inventory.
  • A Subcontract Purchase Requisition is either generated via the Material Requirements Planning process or manually by a requestor.
  • A Buyer will validate the accuracy of the Purchase Requisition and convert it into a Purchase Order.
  • The purchase order is subject to approval based on predefined parameters prior to being issued to a vendor.
  • The consumption of sent components is recorded upon receipt of the value-added finished material.
  • The vendor sends the invoice for the services provided which is paid during the normal payment cycle.
Design Considerations for Subcontracting Process in SAP
To enable the subcontracting process, we need to specify parameters in certain master data and in relevant configuration tables in the system.
The following should exists in the system:
  • Production Bill of Material (BOM) for the subcontracted materials
  • Subcontracting info record for procurement
  • Purchase Order
  • Material Master Record
  • Vendor Mater Record
  • Customer Master Record
  • Price Condition Record
  • Source Lists
  • GL Master Record
  • Cost Element
  • Cost Center
  • Related Product Costing set up
Related Configuration Tables in SAP
  • Purchasing Group (V_024)
  • Tolerance Limits, Invoice Verification (T169G)
  • Storage locations(T001L)
  • Plants (T001W)
  • MRP controllers (T024D)
  • Assignment IM Storage Location to WM Warehouse Number (T320)
  • Blocking Reasons for Automatic Payment Transcations (T008)
  • Automatic Account Determination:Rules for Determination of Standard Accounts (T030R),Tax Accounts Determination (T030K) & Automatic account assignment - default assignments (TKA3A)
Product Costing of Subcontracting Material
  • The SAP system helps us to implement the subcontracting process with integration across various business functions:Purchasing, Engineering,Costing & Finance.
  • Maintenance of relevant Master Data & Configuration Data enables business to run the various steps of the subcontracting process.
  • Required Master Data & Configuration data is part of various SAP modules, including MM, Purchasing, CO-PC and PP.
Standard Cost of Subcontracted Material:
Subcontracted material’s standard cost can be divided into following categories:
  • Cost of raw materials supplied to the vendor that are used to manufacture the subcontracted material
  • Vendor charges for processing these raw materials
  • Cost of the freight, duties and other purchase expenses
  • Overhead involved in procurement
Procurement Related Facts & Simulations
The following transaction codes are important indicators for procurement related facts:
  • Material document list – MB51
  • Stocks of materials – MB52
  • Purchasing Group- MCE1
  • Vendor – MCE3
  • Stock Requirement List- MD04
  • MRP List- MD05
  • Convert Planned Order to PO- MD15
  • PO Price History – ME1P
  • Release Purchasing Documents- ME28
  • Purchasing Documents by Vendor- ME2L
  • Quotation price comp list- ME49
  • Assign and process PR - ME57
  • List Display of Purchase Requisitions– ME5A
  • Vendor Evaluation– ME6H
  • Analysis of Order Values– ME81N
Financial Facts & Simulations
The following transaction codes are important indicators for finance related facts & simulations:
  • Due Date analysis for Open Items (Vendor) - S_ALR_87012078
  • Vendor balances in Local Currency - S_ALR_87012082
  • Vendor Business - S_ALR_87012093
  • List of Vendor Line Items - S_ALR_87012103
  • G/L Account Balances - S_ALR_87012277
  • G/L Line Items, List for Printing - S_ALR_87012282
  • Customer balances in Local Currency - S_ALR_87012172
  • Due Date analysis for Open Items (Customer) - S_ALR_87012168
  • List of Customer Line Items - S_ALR_87012197
  • Balance Sheet / Profit Loss Statement - S_ALR_87012284
  • Generic Withholding Tax Reporting - S_P00_07000134
  • GL Line item Display (New GL) - FAGLL03
  • Customer Line item Display – FBL5N
  • Vendor Line item Display – FBL1N
  • Payment List – F110

2016년 11월 4일 금요일

HTML5 + CSS3

[출처 : http://www.ppomppu.co.kr/ ]


Do it! HTML5+CSS3 웹표준의 정석-1강 (왜 html과 css를 공부해야 할까)
http://youtu.be/A7rPsTWNoQY
Do it! HTML5+CSS3 웹표준의 정석-2강 (html5 시맨틱 태그)
http://youtu.be/v558XsxFh_o
Do it! HTML5+CSS3 웹표준의 정석-3강 (시맨틱 태그로 웹표준에 맞는 문서 만들기)
http://youtu.be/klIErsauYJk
Do it! HTML5+CSS3 웹표준의 정석-4강 (IE를 고려한 시맨틱 태그)
http://youtu.be/Fw9u_aIjYSE
Do it! HTML5+CSS3 웹표준의 정석-5강 (텍스트 관련 태그들)
http://youtu.be/qtWafrsWi9A
Do it! HTML5+CSS3 웹표준의 정석-6강 (목록과 텍스트 태그 연습하기)
http://youtu.be/50ioZsL34KM
Do it! HTML5+CSS3 웹표준의 정석-7강 (하이퍼링크를 만드는 태그)
http://youtu.be/amDPFRh4Io4
Do it! HTML5+CSS3 웹표준의 정석-8강 (HTML5와 이미지)
http://youtu.be/iCnLr9durpQ
Do it! HTML5+CSS3 웹표준의 정석-9강 (이미지 맵으로 이벤트 페이지 만들기)
http://youtu.be/QOLJmvFJcKM
Do it! HTML5+CSS3 웹표준의 정석-10강 (HTML5와 멀티미디어)
http://youtu.be/QxkcTJPL5Xw
Do it! HTML5+CSS3 웹표준의 정석-11강 (다양한 input 태그)
http://youtu.be/SSV63gkvBSo
Do it! HTML5+CSS3 웹표준의 정석-12강 (input 태그의 속성)
http://youtu.be/hapY8EVIUn8
Do it! HTML5+CSS3 웹표준의 정석-13강 (상품 주문서 만들기)
http://youtu.be/DMO03XhJNKQ
Do it! HTML5+CSS3 웹표준의 정석-14강 (CSS기초)
http://youtu.be/4jdFBPye7FI

SAP QM Configuration

[ 출처 : https://archive.sap.com/ ]

You can follow the below steps in SPRO settings in QM management area.
1. MAINTAIN SETTINGS AT PLANT LEVEL:
IMG
> Quality Management> Basic settings --> Maintain settings at plant level.
2. DEFINE CONTROL KEY:
IMG --> Quality Management --> QM in Logistics --> QM in procurement --> Define control keys
3. DEFINE DELIVERY BLOCKING:IMG
> Quality Management> QM inLogistics
> QM in procurement> Define delivery block
4. DEFINE CATALOG TYPES:IMG
> Quality Management> QM Planning --> Basic data --> Catalog --> Define catalog types
5. DEFINE DEFAULT VALUES FOR CONTROL INDICATORS:IMG
> Quality Management> QM
Planning --> Basic data --> Inspection characteristic, inspection method
6. DEFINE SAMPLE TYPE:IMG
> Quality Management> QM Planning
> Basic data à Sample, SPC-> Define sample determination
7. RULE FOR SAMPLE DETERMINATION:IMG
> Quality Management> QM Planning --> Basic data
> Sample, SPC> Define sample determination
8. DEFINE VALUATION MODE: IMG
> Quality Management> QM Planning --> Basic data
> Sample, SPC> Define valuation mode
9. VALUATION RULE: IMG/ Quality Management/ QM Planning/ Basic data/ Sample, SPC/ Define valuation mode
10.ASSIGN TASK LIST TYPE TO MATERIAL TYPE: IMG/ Quality Management/ QM
Planning/ Inspection Planning / General/ Assign task list types to material types
11.DEFINE TASK LIST USAGE: IMG/ Quality Management/ QM Planning/ Inspection Planning/ General/ Define Task list usage
12.DEFINE TASK LIST STATUS:IMG/ Quality Management/ QM Planning / Inspection Planning/ General/ Define Task list status
13.INSPECTION TYPE: IMG/ Quality Management/ Quality inspection/ Inspection lot creation / Maintain inspection types
14.ASSIGN INSPECTION TYPE TO LOT ORIGIN:IMG/ Quality Management/ Quality
inspection/ Inspection lot creation/ Maintain inspection lot origin and assign inspection type
15.DEFINE DEFAULT VALUES FOR INSPECTION TYPE:IMG/ Quality Managementà Quality
inspection/ Inspection lot creation/ Define default values for inspection type
16.DEACTIVATE INSPECTION FOR A GOODS MOVEMENT: IMG/ Quality Management/ Quality
inspection/ Inspection lot creation / Inspection for Goods Movements
17.DEFINE INSPECTION IN PLANT MAINTENANCE:IMG/ Quality Management/ Quality
inspection / Inspection lot creation / Define Inspections in Plant Maintenance.
18.DEFINE RECORDING CONFIGURATION: IMG/ Quality Managementà Quality
inspection / Result recording / Define Recording configuration
19.DEFINE FILTER FOR INSPECTION CHARACTERISTICS:IMG/ Quality Management/ Quality
inspection/ Result recording / Define Filter for Inspection Characteristics.
This is the steps for configuration of QM.


[ 출처 : http://www.erpgreat.com/  http://www.erpgreat.com/sap-qm.htm ]
Assumptions:
a. Material has to be created and available in material master: use: MM01.
b. Only to be used for materials which require an 'Inspection' - basically for the following categories of materials:
 i. In-Process goods materials
ii. Finished goods materials
    Exceptions: Raw Materials (examples in Steel Plant materials or Paper product materials).
c. Ensure you have the right SAP template user-id along with the authorizations for that group & then proceed.
d. Create quality view by MM01 for that material. 
Now activate procurement key. 
Goto inspection type tab page activate inspection type 01 for GR inspection
- Storage View of Material master - MM02
- Inspection (as mentioned above) type allocated - MM02
- Material Class - CL01, CL02 and CL03
- Allocate Material to Class - CL20N (CL20)
- Inspection Methods - QS31, QS32, QS33, QS34
- Class (or General) Characteristics - CT04
- Master Inspection Characteristics (MIC) - QS21, QS22 & QS23
- Inspection Plan - QP01, QP02 & QP03
- Material Specifications check - QS61, QS62 (not a mandatory step)
- Quality Certificates - QZ00, QC01, QC02 or QC03 (Certificate Setup).
- COA Assignment - QC15, QC16 & QC17.
 
Quality Management checklists while implementing SAP
1. Basic settings
1.1  Setting up Clients:
1.2  Maintaining QM Settings at plant level
1.3  Create Number Range for Inspection Characteristics
1.4  Create Number Range for Inspection Method
1.5  Define Planner Groups
1.6  Edit Selected Sets Code Groups/Codes
1.7  Define Control Key for QM Purchasing
1.8  Define Control Key for Operation Level
1.9  Material 
1.10 Master Inspection Characteristics
1.11 Inspection Method
1.12 Sampling Procedure
1.13 Sampling Scheme
1.14 Sample drawing Procedure
1.15 Quality Info record-Procurement
1.16 Quality Info record-SD
2. Inspection Process 
2.1 Incoming Inspection (Inspection Type)
2.2 In process Inspection  (Inspection Type)
2.3 Inspection for a Customer Return (Inspection Type)
2.4 Recurring Inspections for Batch Materials (Inspection Type)
2.5 Early Inspection for a Goods Receipt (Inspection Type- 04)
2.6 Inspection of Physical Samples (Inspection Type)
2.7 Calibration Inspection (Inspection Type) 
 
You can use this trancation codes to direct access for QM work place which the QM user have to maintain.
QCC0 : QM: Direct Access to IMG
QCC1 : Direct Access to IMG: Notification
QCC2 : IMG Direct Access: QM Q-Notification
QCC3 : IMG Direct Access: QM Q-Inspection
QCC4 : IMG Direct Access: QM Q-Planning
QCC5 : IMG Direct Selection: QM Bus. Add-In

2016년 10월 23일 일요일

asterisk-gui install

- svn을 사용하도록 프로그램 설치
sudo apt-get install subversion


asterisk 설치
sudo apt-get install asterisk

https://wiki.asterisk.org/wiki/display/AST/Asterisk+GUI
https://dfighter1985.wordpress.com/2015/04/17/asterisk-gui-on-ubuntu-14-10/

asterisk-gui 설치  

svn checkout http://svn.digium.com/svn/asterisk-gui/trunk asterisk-gui
cd /usr/src/asterisk-gui
./configure
make
make install

설정
 - 기존 설정 백업
cp -r /etc/asterisk /etc/asterisk.backup
make samples  <-- 오류나서 실행 안함.


vi /etc/asterisk/managee.conf

enabled = yes
webenabled = yes
[mark]
secret = mysecret
read = system,call,log,verbose,command,agent,user,config
write = system,call,log,verbose,command,agent,user,config 


vi /etc/asterisk/http.conf
enabled=yes
enablestatic=yes
bindaddr=0.0.0.0

chmod asterisk.asterisk /var/lib/asterisk -R
 
make checkconfig 
asterisk -r
CLI 모드에서 reload
 
http://127.0.0.1:8088/static/config/index.html
 

http show status
manager show settings
 

2016년 10월 20일 목요일

[출처 : https://plus.google.com/ ]

암호화 파일 시스템을 적용하는 것과 관련해서, 한동안 고민을 했었는데.

드디어 해답을 알아내서 팁 하나를 공유드립니다.

linux 에서는 eCryptfs 라는 암호화 파일 시스템을 사용할 수 있는 방법이 제공되고 있습니다.

sudo apt-get install ecryptfs-utils

당근 요렇게 설치해주셔야 쓸 수 있는데, 디렉토리 암호화를 적용하고 싶다고 치면,

해당 디렉토리를 eCryptfs 로 마운트를 하면 간단하게 적용됩니다..
다양한 암호화 알고리즘을 적용할 수 있기 때문에 취향껏 옵션을 선택하시면 됩니다.
(옵션에 따라서 데이터만 암호화 시킬 수도 있고, 파일 이름 까지 암호화 시킬 수도 있습니다.)

sudo mount /home/me/safe /home/me/safe -t ecryptfs -o passphrase_passwd=비밀번호,
ecryptfs_cipher=aes,ecryptfs_key_bytes=24,ecryptfs_passthrough=no,ecryptfs_enable_filename_crypto=no,no_sig_cache=yes

요렇게요.

이 상태에서 읽고 쓰고 하는 것은 모두 암호화 되어서 저장되고 복호화 되어서 읽히고 합니다.

문제는 요렇게 mount 하면 계정 access control 에만 기대게 되어 해당 directory 에 접근할 수 있는 모든 사람들이 다 들어가서 볼 수 있게 된다는 거죠.

퍼미션 시스템에만 기대면 암호화 하는것에 대해서 뭔가 덜 보호되는거 같습니다.
퍼미션이 뚫려도 암호화 파일 시스템으로 최후의 보루를 삼고 싶었던 건데, 아무런 보호가 안된다니?

바로 이걸 위해서 unshare 를 쓰는 겁니다.

unshare - -mount - - /bin/bash -c "sudo mount /home/me/safe /home/me/safe -t ecryptfs -o passphrase_passwd=비밀번호,
ecryptfs_cipher=aes,ecryptfs_key_bytes=24,ecryptfs_passthrough=no,ecryptfs_enable_filename_crypto=no,no_sig_cache=yes && 기타 등등 하고 싶은 짓"

( - - 는 붙여야 합니다.)

요런식으로 하면, eCryptfs 로 마운트되는게 저 안에서만 유효하기 때문에
설령 내 계정으로 /home/me/safe 에 들어가서 보더라도 암호화된 텍스트 밖에 못 보게 됩니다.

2016년 10월 18일 화요일

Linux PHP에 오라클 연동하기

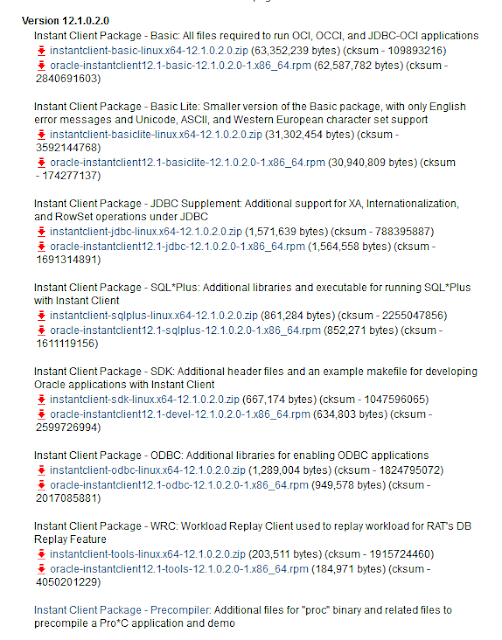
오라클 사이트에서 운영체제에 맞는 Client를 다운받아 설치 한다.


 oracle-instantclient12.1-basic-12.1.0.2.0-1.x86_64.rpmoracle-instantclient12.1-devel-12.1.0.2.0-1.x86_64.rpm

다운로드 완료 후 설치

# rpm -i oracle-instantclient12.1-basic-12.1.0.2.0-1.x86_64.rpm
# rpm -i oracle-instantclient12.1-devel-12.1.0.2.0-1.x86_64.rpm


OCI8의 최신 버전을 사이트에서 확인 후 다운 받아 압축을 푼다.

# wget http://pecl.php.net/get/oci8-2.1.2.tgz
# tar xvzf oci8-2.1.2.tgz
# cd oci8-2.1.2


Oracle Client 설치 위치가 아래 경로를 확인하고 컴파일시해당 경로명 입력

32비트 : /usr/lib/oracle/12.1/client/lib/ 64비트: /usr/lib64/oracle/12.1/client/lib/


# phpize
# ./configure --with-oci8=shared,instantclient,/usr/lib(64)/oracle/12.1/client/lib/
# make all install


여기까지 완료 되면 /usr/lib/php/modules에 oci8.so가 생성됨.

php에 해당 모듈 로드 하도록 설정 추가(/etc/php.d/ 에 ini 파일 추가)

# echo 'extension=oci8.so' > /etc/php.d/oci8.ini
# service httpd restart


여기까지 완료 되면 php애소 oracle 함수 사용 가능함.

정상적으로 설치가 완료 되었는데 php에서 오류가 아래와 같이 날 경우 조치

아마도 여러분의 아파치 error_log에 이렇게 나타나있을겁니다.

PHP Warning:  PHP Startup: Unable to load dynamic library '/usr/lib/php/modules/oci8.so' - libnnz11.so: cannot enable executable stack as shared object requires: Permission denied in Unknown on line 0

# /usr/sbin/setenforce 0

# vi /etc/selinux/config
SELINUX=disabled  <-- 변경

2016년 10월 10일 월요일

마우스 우클릭 막은 사이트 해제하기


파이어폭스의 부가기능 Greasemonkey의스크립터를 이용한 방법
http://userscripts.org/로 이동하여 검색 기능에 naver로 검색한다.
 검색결과중 Anti-Disabler for Naver Pro+Last Update를 설치한다.


2016년 8월 31일 수요일

DNS 트래픽이 유난히 높을 때

[출처 : http://tdoodle.tistory.com/ }

Cent-OS 6.4 를 새로 설치하고 테스트 하던 중
Out-bound traffic 이 주기적으로 높아지는 걸  발견
iftop (또는 iptraf)로 트래픽의 주범을 찾아 보니 UDP 53번 포트 (DNS)
DNS  Attack 의 일종이다.
막는 방법은 아래와 같다.

IPTables 에 다음 라인을 추가한다.
-I INPUT -p udp --dport 53 -m string --from 40 --to 51 --algo bm --hex-string '|04706b7473046173696100|' -j DROP -m comment --comment "DROP DNS Q pkts.asia"
-A INPUT -p udp -m udp --dport 53 -m state --state NEW -m recent --set --name DEFAULT --rsource
-A INPUT -p udp -m udp --dport 53 -m state --state NEW -m recent --update --seconds 10 --hitcount 10 --name DEFAULT --rsource -j DROP

2016년 8월 17일 수요일

CMD 명령어를 활용한 시스템 분석 – 여러가지 명령어들

[출처 : http://www.sharedit.co.kr/ ]


<CMD 명령어 모음>
모든 명령어는 win + R키나 cmd 명령창에서 실행하실 수 있습니다
아랫쪽에 SYSINTERNALS 도구와 NIRSOFT 도구, 기타 명령어 목록도 있습니다

$$ CMD 명령어
$ .MSC

eventvwr.msc(이벤트뷰어)
gpedit.msc(로컬 그룹 정책 설정)
secpol.msc(로컬 보안 설정)
wmimgmt.msc(WMI 관리자)
certlm.msc (인증서관리자 – 로컬컴퓨터)
certmgr.msc(인증서관리자 – 현재사용자)
fsmgmt.msc(공유폴더)
lusrmgr.msc(로컬 사용자 및 그룹)
printmanagement.msc(프린터 관리)
wf.msc(방화벽고급관리자)
devmgmt.msc (장치 관리자)(= hdwwiz.cpl)
compmgmt.msc(컴퓨터관리)
perfmon.msc(성능모니터)
taskschd.msc(작업 스케쥴러)
comexp.msc (구성요소 COM,COM+,DCOM 서비스)(= dcomcnfg.exe)


$ .EXE

$ winmgmt.exe (WMI 관리도구)
$ color.exe (프롬프트 색상을 바꿉니다)
        # 흰 색상에 검정글씨로 바꿉니다
        $ color f0


$ fsquirt.exe (블루투스를 이용한 파일 송수신)
$ getmac.exe (MAC주소를 출력하는 프로그램)
        # MAC주소를 자세히 확인합니다
        $ getmac.exe /v


$ label.exe (디스크 볼륨레이블 지정)
$ pnputil.exe (pnp 디바이스 열거/설치/삭제)
        # c:\drivers에 모든 패키지를 추가합니다
        $ pnputil.exe -a c:\drivers\*.inf

        # 패키지를 열거합니다
        $ pnputil.exe -e


$ psr.exe (단계레코더)
$ qprocess.exe (tasklist의 단순형 프로그램)
$ launchtm.exe (작업관리자)(taskmgr.exe와 동일합니다)
$ makecab.exe (cab 파일 만들기)
$ narrator.exe (음성지원 나레이터)
$ ping.exe (ping을 날리는 프로그램)
$ pathping.exe (ping + 패킷이 전달되는 루트를 추적합니다)
$ ftp.exe (ftp 클라이언트 프로그램)
$ useraccountcontrolsettings.exe (UAC 세팅)
$ bdehdcfg.exe (bitlocker 드라이브 준비도구)
$ dfrgui.exe (디스크 조각 모음)
$ changepk.exe (윈도우즈 제품키 입력)
$ certutil.exe (인증서 유틸리티)
$ diskpart.exe (디스크 파티션 설정)
$ eventcreate.exe (사용자 지정 이벤트 생성)
$ chkntfs.exe (디스크검사 예약)
        $ chkntfs.exe c: /c

$ chkdsk.exe (디스크 검사)
$ certreq.exe (요청을 인증기관으로 제출하는 유틸리티)
$ mrt.exe(악성소프트웨어 제거도구)
$ cprintui.exe(프린터 UI)
$ sigverif.exe(File Signature Verification Tool)
$ resmon.exe(리소스 모니터)
$ robocopy.exe (견고한 파일복사)
        # desktop에 있는 파일들을 c:\test에 복사합니다
        # 비어있는 디렉토리 제외, Multi Thread 20개 사용, 복사실패 시 1번 재시도, 대기시간 1초, 7개의 하위디렉토리 복사
        $ robocopy.exe C:\Users\edward\Desktop c:\test /S /MT:20 /R:1 /W:1 /LEV:7


$ xcopy.exe (파일복사 프로그램)
        # deskop에 있는 파일들을 c:\test에 복사합니다
        # 하위 디렉토리, 오류가 생겨도 계속 복사, 조용히 복사, 겹치는 파일 묻지 않고 복사, 특성을 복사, 숨겨진파일과 시스템파일 모두 복사합니다
        $ xcopy.exe C:\Users\edward\Desktop c:\test /s /c /q /y /k /h
        # WebcacheV01.dat 파일을 바탕화면에 복사합니다 (taskhost, dllhost 프로세스를 먼저 종료해야합니다)
        $ xcopy.exe /s /h /i /y “%Localappdata%\Microsoft\Windows\Webcache\*.dat” %userprofile%\desktop


$ copy.exe (간단한 파일복사)
$ charmap.exe(문자표)
$ wbemtest.exe(WMI 테스터)
$ magnify.exe(돋보기)
$ setx.exe
        # path 환경변수를 영구적으로 설정합니다
        $ setx.exe path “%path%;경로” /m  

$ shutdown.exe (컴퓨터 종료)
        # 컴퓨터를 바로 강제로 종료합니다
        $ shutdown.exe /s /t 0 /f

        $ shutdown.exe /r /t 0 /f
        $ shutdown.exe /l


$ tlntsvr.exe (텔넷서버실행) (추가기능 설치에서 telnet을 설치해야합니다)
$ tlntadmn.exe (텔넷서버관리) (윈도우8부터는 없어진듯합니다)
$ wbadmin.exe(윈도우 백업관리자)
$ fsutil.exe(디스크 구성 도구)
$ fltmc.exe(필터 드라이버 로딩 언로딩 목록 보기)
$ cleanmgr.exe(디스크 정리)
$ sndvol.exe (스피크 볼륨 콘트롤)
$ wevtutil.exe(이벤트로그 수집도구)
$ slidetoshutdown.exe (화면을 슬라이드해서 종료)
$ esentutl.exe(서버데이터베이스 관리 도구)
        # 해당 .dat 파일의 상태를 확인합니다
        $ esentutl.exe /mh WebCacheV01.dat
        # 해당 .dat 파일이 dirty shutdown 상태이면 clean shutdown 상태로 고쳐줍니다
        $ esentutl.exe /p WebCacheV01.dat


$ mmc.exe (콘솔 루터)
$ msconfig.exe (시스템 구성요소 유틸리티)
$ mstsc.exe (원격 데스크톱 연결)
$ odbcad32.exe(odbc 데이터 원본 관리자)
$ wuapp.exe(윈도우 업데이트)
$ dxdiag.exe (다이렉트X 정보)
$ msinfo32.exe (시스템 정보)
$ slui.exe (라이센스 등록)
$ slmgr.exe (라이센스 등록2)
        $slmgr.exe /ipk /dlv /ato


$ osk.exe (화상 키보드)
$ wmplayer.exe (미디어 플레이어)
$ mkdir.exe (디렉토리 만들기)
$ mklink.exe (바로가기 폴더 만들기)
        # aaa 폴더의 바로가기 폴더 bbb를 만듭니다
        $ mklink.exe /d c:/bbb c:/aaa


$ taskmgr.exe (작업 관리자)
$ cmd.exe (명령 프롬프트)
$ explorer.exe (윈도우 탐색기)
$ rstrui.exe(시스템복원)
$ systeminfo.exe(시스템정보)
$ taskkill.exe (프로세스 종료)
        # 메모장 프로세스를 강제로 자식노드까지 전부 종료합니다
        $ taskkill.exe /f /im “notepad.exe” /t


$ tasklist.exe (프로세스 목록)
        $ tasklist.exe /svc /fi “imagename eq <processname>”
        $ tasklist.exe /svc /fi “services eq <servicename>”
        $ tasklist.exe | find /i “explorer”

$ timeout.exe (지정된 시간을 기다리는 프로그램)
        $ timeout.exe /t 100 /nobreak

$ tskill.exe (간단한 프로세스 종료 프로그램)
$ systempropertiesadvanced.exe (시스템속성 – 고급)
$ systempropertiesdataexecutionprevention.exe (시스템속성 – 데이터실행방지 dep)
$ systempropertiecomputername.exe (시스템속성 – 컴퓨터이름)
$ systempropertieshardware.exe (시스템속성 – 장치관리자)
$ systempropertiesperformance.exe (시스템속성 – 성능옵션)
$ systempropertiesremote.exe (시스템속성 – 원격)
$ gpupdate.exe(그룹 정책 업데이트)
        $ gpupdate.exe /force


$ cmdkey.exe(자격증명 저장 관리)
        $ cmdkey.exe /add:<targetname> /user:<username> /pass:<password>

$ find.exe (특정 문자열 찾기)
        # mysql_ed.sql 파일에서 create가 들어간 구문을 찾습니다
        $ find.exe mysql_ed.sql “create” /n /i

        # abc.txt 파일의 라인 수를 셉니다
        $ find.exe /c /v abc.txt “”

        # 현재 동작하는 프로세스 중 대소문자를 구분하지 않고 sql 글자가 들어간 구문을 검색합니다
        $ tasklist.exe | find.exe /i “sql”


$ optionalfeatures.exe(윈도우 기능 켜기/끄기)
$ forfiles.exe (하위파일까지 전체탐색)(루프돌리는 배치파일 만들 때 유용)
$ regedit.exe (레제스트리 GUI 편집도구)
$ regsvr32.exe (COM 모듈 등록/해제)
$ cleanmgr.exe(Disk Clean Up)
$ rundll32.exe
        # 절전 모드
        $ rundll32.exe powrprof.dll SetSuspendState 0,1,0
        # 환경 변수
        $ rundll32.exe sysdm.cpl EditEnvironmentVariables
        # 화면 잠금
        $ rundll32.exe user32.dll LockWorkStation
        # 자격증명 저장 관리
        $ rundll32.exe keymgr.dll KRShowKeyMgr


$ runas.exe (권한상승 후 프로그램 실행)
$ snippingtool.exe(캡처도구)
$ dcomcnfg.exe(구성요소 COM,COM+,DCOM 서비스)(=comexp.msc)
$ winver.exe(윈도우버전)
$ where.exe (Linux find와 비슷한 명령어, 검색명령어)
        # 바탕화면에서 edw로 시작하는 파일을 전부 검색합니다
        $ where.exe edw* /r c:\users\gyurs\Desktop\


$ control.exe (제어판)
$ sc.exe (서비스컨트롤 명령어)
$ powercfg.exe (전원옵션 명령어)
$ soundrecorder.exe (음성 녹음기)
$ reg.exe (레지스트리 추가/수정 명령어)
        # 해당 레지스트리 값을 추가합니다 (psexec을 사용하기 위해)
        $ reg.exe add hklm\software\microsoft\windows\currentversion\policies\system /v localaccounttokenfilterpolicy /t reg_dword /d 1 /f
        # UAC 세팅을 해제합니다 (재부팅 필요)
        $ reg.exe add hklm\software\microsoft\windows\currentversion\policies\system /v enablelua /t reg_dword /d 0 /f
        # IPC$의 기본공유를 해제합니다
        $ reg.exe add hkey_local_machine\system\currentcontrolset\control\lsa\ /v restrictanonymous /t reg_dword /d 2 /f
        # ADMIN$, C$의 기본공유를 해제합니다
        $ reg.exe add hkey_local_machine\system\currentcontrolset\services\lanmanserver\parameters /v autosharewks /t reg_dword /d 0 /f


$ net.exe (네트워크 설정 명령어)

$ NET STATS
        # 시스템 마지막 부팅시간을 확인합니다
        $ net stats work

$ NET SHARE
        # IPC$ 자동공유를 중지합니다 (C$, ADMIN$도 삭제할 수 있습니다)
        $ net.exe share IPC$ /delete
        # IPC$ 자동공유를 다시 설정합니다
        $ net.exe share IPC$ /grant:gyurse,full

$ NET USER
        # ashley 라는 계정을 생성합니다. 비밀번호는 qwer1234 fullname은 Iron Man, comment는 hello guys, 계정은 활성화상태입니다
        $ net.exe user ashley qwer1234 /add /fullname:”Iron Man” /comment:”hello guys” /active:yes
        
        # ashley의 자세한 정보를 확인합니다
        $ net.exe user ashley

        # ashley 계정을 삭제합니다
        $ net.exe user ashley /delete

$ NET LOCALGROUP
        # ashleygroup 이라는 이름의 localgroup을 생성합니다 comment도 같이 생성합니다
        $ net.exe localgroup ASHLEYGROUP /add /comment:”here is ashley world”

        # ashley 계정을 ASHLEYGROUP 그룹에 추가시킵니다
        $ net.exe localgroup ASHLEYGROUP ashley /add

$ NET USE
        # localhost의 컴퓨터 자체에 계정명 ashley, 패스워드 qwer1234로 접속합니다 (사용자와 연결이 아닙니다)
        $ net.exe use \\localhost\IPC$ /user:ashley qwer1234

        # localhost의 share라는 폴더에 계정명/패스워드로 접속합니다
        $ net.exe use \\localhost\share /user:ashley qwer1234


$ NET TIME
        # localhost의 시간을 확인할 수 있습니다
        $ net time \\localhost


$ msg.exe (네트워크 사용자들에게 메세지 보내는 명령어)
        # 컴퓨터의 모든 사용자들에게 5초동안 유효한 hello guys 메세지를 보냅니다
        $ msg.exe * /v /time:5 hello guys

        # localhost의 모든 세션 사용자들에게 hello guys2 메세지를 보냅니다
        $ msg.exe * /server:localhost /v /w hello guys2


$ subst.exe (디렉토리, 주소를 가상 드라이브로 치환해주는 명령어)
        # c:\temp 경로를 X: 드라이브로 치환합니다
        $ subst.exe X: C:\temp\

        # X 드라이브에 접속합니다
        $ cmd> X:

        # 해당 치환경로를 삭제합니다
        $ subst.exe X: /d


$ netsh.exe (IP, 방화벽 등등 네트워크 설정 명령어 )

$ NETSH ADVFIREWALL (cmd> wf를 통해 확인할 수 있습니다)
        # 새로운 방화벽 허용룰을 추가합니다 이름은 TCP-445이고 tcp 445번 포트의 접속을 허용합니다
        $ netsh.exe advfirewall firewall add rule name=”TCP-445″ dir=in action=allow protocol=tcp localport=445

        # tcp-445라는 이름을 가진 방화벽 정책을 확인합니다
        $ netsh.exe advfirewall firewall show rule name=”tcp-445″

        # 현재 방화벽 설정을 파일로 저장하고 나중에 가져올 수 있습니다
        $ netsh.exe advfirewall export c:\advfirewallpolicy.wfw
        $ netsh.exe advfirewall import c:\advfirewallpolicy.wfw

        # 현재 방화벽 설정을 볼 수 있습니다
        $ netsh.exe advfirewall firewall show rule name=all | more

        # 2000 – 3000 번 포트 접속을 막습니다
        $ netsh.exe advfirewall firewall add rule name=”Block_2000_3000″ dir=in action=block protocol=tcp localport=2000-3000


$ NETSH INTERFACE
        # 네트워크 인터페이스 목록을 확인합니다
        $ netsh.exe interface show interface

        # 모든 네트워크 인터페이스 목록을 확인합니다
        $ netsh.exe interface dump

        # 원격포트가 443번인 모든 ipv4 tcp 연결을 확인합니다
        $ netsh.exe interface ipv4 show tcpconnections remoteport=443

        # ipv4 프로토콜의 여러 매개변수들을 확인합니다
        $ netsh.exe interface ipv4 show global

        # 현재 네트워크카드의 IP 관련된 설정을 확인합니다
        $ netsh.exe interface ipv4 show config

        # IP를 DHCP로 설정합니다
        $ netsh.exe interface ip set address name =”Ethernet” source=dhcp
        $ netsh.exe interface ip set dns “Ethernet” dhcp


$ .CPL (CONTROL PANEL 제어판)

$ powercfg.cpl(전원옵션)
$ firewall.cpl(방화벽 관리)
$ desk.cpl(디스플레이)
$ appwiz.cpl(프로그램추가/제거)
$ main.cpl(마우스)
$ mmsys.cpl(사운드 및 오디오장치)
$ hdwwiz.cpl (장치관리자)(= devmgmt.msc)
$ sysdm.cpl(시스템속성)
$ inetcpl.cpl(인터넷속성)
$ netplwiz.cpl(사용자계정2) (= control userpasswords2)
$ ncpa.cpl(네트워크 연결)
$ wscui.cpl(관리센터)
$ timedate.cpl(날짜 시간 속성)
$ control /name Microsoft.NetworkandSharingCenter(네트워크 공유센터)
$ control desktop(개인 설정)
$ control /name Microsoft.Troubleshooting(문제해결)
$ control userpasswords(사용자 계정)
$ control userpasswords2 (사용자계정2) (= netplwiz)
$ control printers(장치 및 프린터)
$ control folders(폴더옵션)
$ control keyboard(키보드 옵션)
$ control admintools(관리 도구)


———————————————————————————————————–
<SYSINTERNALS & NIRSOFT 명령어>
$$ SYSINTERNALS 명령어

$ psexec.exe (원격명령어 실행 도구)
        # 원격컴퓨터에서 실행해야할 명령어들
        # ADMIN$, IPC$ 공유가 설정되어있어야 합니다
        $ net.exe share

        # 타겟컴퓨터에 해당 레지스트리 값을 추가합니다
        $ reg.exe add HKLM\SOFTWARE\Microsoft\Windows\CurrentVersion\Policies\system /v LocalAccountTokenFilterPolicy /t REG_DWORD /d 1 /f

        # 타겟컴퓨터에 445번 포트를 개방합니다
        $ netsh.exe advfirewall firewall add rule name=”TCP-445″ dir=in action=allow protocol=tcp localport=445

        # 타겟컴퓨터 Start -> Run -> secpol.msc -> Local Policies -> Security Options -> Network Access: Sharing > and security model for local accounts > Classic – local users authenticate as themselves

        # 내컴퓨터, psexec 명령어를 사용합니다
        $ psexec \\172.30.1.15 -u <hostname> -p <password> <command>


$$ NIRSOFT 명령어
$ nircmd.exe (nirsoft cmd)
        # 프로그램을 hide 모드로 실행합니다
        $ nircmd.exe exec hide <processname>


———————————————————————————————————-
<기타 여러 프로그램들 명령어>
$$ 기타 여러 프로그램들 명령어

$ pscp.exe (putty 파일 전송 프로그램)
        # pscp를 이용해 tempuser 계정과 qwer1234 비밀번호를 사용해서 원격에  tigerk 하위폴더의 모든 내용을 내 컴퓨터의 바탕화면에 복사합니다
        $ pscp.exe -r -pw qwer1234 tempuser@210.113.90.70:C:\\Users\\tigerk0430\\Desktop\\tigerk c:\\users\\gyurs\\Desktop

2016년 6월 17일 금요일

MSSQL 관련 SQL문장

테이블 목록 보기

sp_tables
select * from information_schema.tables
select name from sysobjects where type='U'


Windows 성능 분석 – CPU 성능데이터 분석

[ 출처 : https://codeclassic.wordpress.com/ ]

Windows에 내장된 성능모니터를 사용하면, 원하는 기간에 대한 서버 또는 PC의 시스템 자원 활용도를 분석할 수 있습니다.
기본적으로 [시작]-[실행]을 클릭하고, ‘PerfMon’을 실행하여, 아래의 화면을 표시할 수 있습니다.


본 문서와 블로그에서는 성능모니터 도구 사용법 자체보다는, 시스템의 자원의 각 요소를 모니터링 하는 방법을 다루고자 합니다.
성능모니터 도구 사용법이 익숙하지 않다면, 아래의 자료를 참고할 수 있습니다.

성능 모니터링 시작 가이드http://technet.microsoft.com/ko-kr/library/dd744567%28v=ws.10%29.aspx 
시스템의 자원은 CPU, 메모리, 디스크, 네트워크 등, 크게 4가지 요소로 이루어져 있습니다.
그 중 CPU에 대해서는 보통 CPU 활용도, 커널 관련 입출력 등의 성능 카운터를 종합적으로 분석하게 됩니다.

카운터 소개 – [성능 카운터 정보 : 성능오브젝트\카운터(인스턴스명) ]


Processor\%Processor Time (_Total)
프로세서 사용 시간의 백분율이며, 전체 CPU시간에서 유휴 CPU시간을 제외한 시간의 백분율입니다.
CPU 사용률이 높으면, 어떤 사용자 프로세스가 CPU시간을 많이 쓰는지, 또는 시스템에서 소비하는 것인지 구분해 판단하게 됩니다.
Processor\%Privileged Time (_Total)
전체 CPU시간에서, 유휴 CPU시간과 사용자 CPU시간(User mode)을 제외한, 즉 시스템(커널)의 CPU 활용률 입니다.
사용자 프로세스나 일반 응용프로그램 이외에도 시스템의 CPU 사용률이 높아서 성능에 문제가 생기는 경우도 있습니다.
예를 들면, 네트워크 관련 드라이버, 그래픽 드라이버 등의 문제,
또는 사용자 프로그램의 지나친 커널 구성요소 호출에 의해서도
이 성능카운터의 값이 매우 높게 나타날 수 있습니다.

Process\%Processor Time (프로세스명)
특정 프로세스의 CPU 사용률입니다. IIS의 경우 웹응용프로그램 프로세스인 w3wp.exe를 모니터 하게 됩니다.

System\Context Switches/sec
프로세서가 실행할 대상 쓰레드를 변경한 수입니다. 다른 쓰레드의 실행은 비단 멀티쓰레드 응용프로그램 실행에 한정되는 것이 아니라,
시스템의 여러 프로세스를 실행하면서, 또는 단일 쓰레드 프로그램이라도 커널API를 호출하여 수행하면서 변경이 일어나게 됩니다.
Context Switch가 매우 많으면, CPU사용률과는 별개로 CPU 처리 지연의 원인이 될 수 있습니다.

System\System Calls/sec
시스템 전체에서의 운영 체제 서비스 루틴의 호출 수입니다. Context Switch와 마찬가지로 지나치게 많은 호출이 발생하면,
CPU성능에 영향을 주게 됩니다.

System\Processor Queue Length
실행 준비가 되어 있는 쓰레드 중에서, 프로세서 큐(대기열)에 있는 쓰레드 수입니다. 일반적으로 프로세서가 바쁘지 않다면,
대기열의 길이는 ‘0’이 됩니다. 따라서, CPU 상태가 현재 여유가 있는지, 아니면 매우 바빠서 추가로 명령을 실행할 여유가 없는 건인지 판단하는
매우 중요한 카운터입니다.


성능 카운터의 모니터링 위에서 언급된 카운터를 모두 추가하여, 차트로 모니터링을 하거나, 일정 기간 데이터를 파일로 기록해 두었다가 나중에 분석할 수 있습니다.
성능 모니터 도구의 세부 기능을 활용하면, 성능 기록뿐 아니라, 알림, 로그 분석 등을 통해 유용한 정보를 확인할 수 있습니다.


Windows의 성능, 특히 CPU성능의 분석을 위해 모니터링이 필요한 카운터를 정리해보았습니다.


프로세서 병목의 판단
이번에는 수집된 성능 데이터를 기반으로,
CPU 병목을 정의하는 과정에 대해 정리해 보고자 합니다.
먼저 시스템의 성능과 CPU사용률(%Processor Time)에 대한
기본적인 이해가 필요할 것으로 생각됩니다.
각 성능 요소(카운터)의 정의는 이전 글에서 살펴보았습니다.

프로세서 성능의 분석에서 CPU사용률은, 불과 20%미만이라도 CPU병목으로 판단될 수 있고, 75%이상이어도 CPU병목이 아닐 수 있습니다.
CPU 사용률이 10%이지만, 과도한 Context Switch나 System call이 발생하면,
이것 역시 CPU병목을 유발할 수 있고,
CPU 사용률이 80%인 경우, WWW 서비스나 DB서버가 작업을 수행하는데 전혀 문제가 없다면, 병목이 있다고 판단하기 어렵습니다.

특히 CPU 사용률이 80%인 경우, 응용프로그램의 추가 명령어 수행을 필요로 했다면, 적시에 실행 가능한 상태였고,
80%인 경우도 여전히 프로세서의 유휴 상태가 존재했으며,
프로세서의 추가로 성능이 향상될 것이라고 기대하기도 분명하지 않습니다.
무엇보다도, H/W기술자가 아닌, 서비스 운영 담당자에게는
이러한 병목의 판단과 성능 지연 여부가 중요한 의미를 갖습니다.

그러므로, CPU병목은, 시스템 성능에서 CPU의 처리 지연이 발생한 것의 정의를,
시스템의 핵심기능을 수행하기 위해,
프로세서 용량이 부족한 것인지를 기준으로 판단하는 것이 필요합니다.
이러한 판단을 위해, 앞에서 여러 카운터를 사용해 데이터를 수집하는 방법을 살펴보았습니다.

Processor\%Processor Time (_Total)
Processor\%Privileged Time (_Total) Process\%Processor Time (프로세스명 – W3WP.EXE, SQLSERVR.EXE 등)System\Context Switches/secSystem\System Calls/sec
System\Processor Queue Length

위에 언급된 모든 카운터는 모두 의미를 담고 있습니다.
특히 시스템 성능을 모니터링 할 경우 꼭 필요한 요소입니다.
한편으론, 위의 카운터는 2 종류로 나눌 수 있는데, 하나는 상태를 나타내는 정보(사용량)이고,
다른 하나는 지연 여부를 확인할 수 있는 정보(성능지표)입니다.

즉 %Processor Time은 사용률을, Context Switches의 경우는 프로세서의 컨텍스트 변경수를 의미하며,
그 수의 많고 적음을 보게 됩니다.
반면에, Processor Queue Legnth(PQL, 프로세서 처리 대기열의 길이(쓰레드수))는
이러한 지연 여부(처리 지연 발생 여부)를 판단하는데 큰 도움이 됩니다.

엄청난 문자열 연산이나 계산으로 CPU사용률이 높았거나,
또는 잦은 시스템(커널) 루틴의 명령 수행으로 Context Switch가 높았건 간에,
결국은 PQL에 반영됩니다.
즉, PQL이 ‘0’이 아니라면, 프로세서가 너무 바쁜 관계로,
이미 처리할 준비가 되어있는 작업 쓰레드(프로세서가 살펴봐 주기를 바라는 사용자 프로그램)
에 가서 처리를 수행하지 못하는 것이므로, CPU성능병목 판단의 중요한 지표가 됩니다.

정의된 성능병목과 병목을 유발한 원인은 별개의 문제입니다.
프로세서가 병목이라고 해서, 성능 저하나 서비스 장애 원인이
CPU성능이라고 보는 것은, 열심히 일한 프로세서 입장에선 억울할겁니다.
프로세서가 처리할 응용프로그램의 설계된 동작에 직접적인 영향을 받고,
DB의 설계에도 영향을 받으며, 잘못 설치된 드라이버(커널CPU),
잘못 작성한 코드로 업데이트 된 백신 등도 원인이 됩니다.

그러므로, 객관적인 성능 자료를 바탕으로 정리된 분석이 중요합니다.
참고로, 성능 문제가 있을 경우, PerfMon사용을 걱정하는 경우가 있는데,
PerfMon은 참 (1)가볍고, (2)성능에 우려가 있을 때 꼭 실행이 필요한 프로그램입니다.
수집대상(필요한 카운터)과 수집기간, 주기를 주의해서 사용하면 도움이 됩니다.
예를 들어 분석하고 싶은 카운터만 1일 동안,
매 10초 간격 등으로 설정하여 수집하면, 시스템에 큰 부담을 주지 않습니다.


성능 분석을 위한, CPU 관련 카운터 추가 정보
Processor\%Processor Time (_Total)
Processor\%Privileged Time (_Total)
CPU 사용률, 커널 사용률 등은 그 값 자체로 성능분석에 중요한 의미가 있으며,
일시적이 아니라 지속적으로 높은 사용률을 유지하게 되면,
CPU성능이 시스템이 운영하는 핵심 서비스 성능에 영향을 주고 있다고 볼 수 있습니다.

따라서, 시스템(커널) 사용 시간, 응용프로그램 프로세스 별 사용률 등을 종합적으로 보고, 판단합니다.
단일 프로세스의 단일 쓰레드가 CPU시간을 대부분 소비할 경우, 더 빠른 CPU 추가가 결론이 될 수 있습니다.
서버에서는 PQL 값이 더욱 명확하게 프로세서 병목과, 프로세서 추가 필요성을 정의하는데 도움이 됩니다.

Process\%Processor Time (프로세스명 – W3WP.EXE, SQLSERVR.EXE 등)
프로세스 성능 오브젝트 이하의 %Processor Time은 최대값이 100x프로세서수 입니다.
즉, 프로세서가 4개인 경우 400%가 최대값이 됩니다.
CPU는 프로세스라는 논리적인 메모리 공간 보다는,
실제 수행할 명령어를 포함하고 있는 쓰레드를 대상으로 작업을 수행하며,
하나의 프로세스는 여러개의 쓰레드를 포함할 수 있기 때문입니다.
4개의 CPU가 MyApp이라는 프로세스 안에, 4개의 쓰레드만 계속 실행하는 경우,
그 예가 될 수 있습니다. (CPU 100% x 4)

성능 병목의 분석 과정에서, 이 값이 높으면 문제라고 보기 보다는,
핵심 서비스가 프로세서를 잘 활용할 수 있는가의 측면도 중요합니다.프로세서는 기본적으로 메인보드에 있는 칩이라고 봅니다.
CPU를 마치 같이 일하는 동료라고 보고,
IDLE(?)하게 만들어야 잘 설계된 것이라고 생각하진 않습니다.

System\Context Switches/secSystem\System Calls/sec
일반적으로 서버 시스템의 서비스는 단일 쓰레드 응용프로그램보다는
잘 설계된 다중 쓰레드 서비스 프로그램이 매우 유리합니다.
Context Switch는 프로세서가 처리할 명령어셋이 변경/로드되는 경우에 발생하며,
다중 쓰레드 설계로 인해 증가하는 부분보다는, 커널 루틴 호출로 인해 발생하는 경우가 큽니다.
특히 서버의 프로세서가 1-2개인 경우, Context Switch에 의해 병목을 유발하는 경우가 있습니다.
이 경우 CPU 사용률이 낮은데도, PQL은 커지게 될 수 있습니다.

’System’ 성능 오브젝트의 카운터들은 프로세서당 값으로 분석하므로,
프로세서가 4개인 경우, 해당값에서 4로 나눈 값으로 병목을 판단합니다.

예를 들어, Context Switches/sec가 20000인 경우,
CPU가 한 개라면 힘겨운 상황이지만, 4개라면 5000/sec 정도로, 상대적으로 가볍게 볼 수 있습니다.
주로 검색되는 문서에서는 프로세서당 5000개 또는 10000개 이상을 병목으로 보기도 하지만,
과거, 프로세서 속도가 1.X GHz, 2.0GHz에서 테스트 된 결과이기도 해서,
선택적으로 판단할 필요가 있습니다.

System\Processor Queue Length
프로세서당 처리 대기 쓰레드 수가 지속적으로 ‘0’이 아닌 값이면,
프로세서 병목으로 인해 시스템 성능이 지연되는 것으로 판단할 수 있습니다.
CPU 병목 판단의 임계값으로 프로세서당 ‘2’ 이상의 값을 사용할 수 있습니다.