2023년 12월 14일 목요일

[Linux]_Boot 파티션 용량 full 해결법(Rocky linux)

  [ 출처 :  https://www.centlinux.com/ ]


리눅스는 기본적으로 과거 커널을 5개까지 보관하고 있는데 이로 인하여 /Boot 파티션 용량이 full이 되면서 업데이트가 되지 않는 경우가 발생함.

# cat /etc/yum.conf  <--아래 보관횟수 확인 가능

[main]
gpgcheck=1
installonly_limit=3
clean_requirements_on_remove=True
best=True
skip_if_unavailable=False

# rpm -q kernel  <--설치된 kernel 확인
kernel-5.14.0-162.6.1.el9_1.0.1.x86_64
kernel-5.14.0-284.25.1.el9_2.x86_64
kernel-5.14.0-284.30.1.el9_2.x86_64

# grubby --default-kernel  <-- 사용중인 kernel 확인
/boot/vmlinuz-5.14.0-284.30.1.el9_2.x86_64

* 과거 커널을 삭제 하는 방법

# dnf -y remove --oldinstallonly --setopt installonly_limit=2 kernel
Dependencies resolved.
==============================================================================================================================================================================================
 Package                                           Architecture                         Version                                                Repository                                Size
==============================================================================================================================================================================================
Removing:
 kernel                                            x86_64                               5.14.0-162.6.1.el9_1.0.1                               @anaconda                                  0
 kernel                                            x86_64                               5.14.0-284.25.1.el9_2                                  @baseos                                    0
 kernel-core                                       x86_64                               5.14.0-162.6.1.el9_1.0.1                               @anaconda                                 84 M
 kernel-core                                       x86_64                               5.14.0-284.25.1.el9_2                                  @baseos                                   56 M
 kernel-devel                                      x86_64                               5.14.0-162.6.1.el9_1.0.1                               @AppStream                                60 M
 kernel-devel                                      x86_64                               5.14.0-284.25.1.el9_2                                  @appstream                                63 M
 kernel-modules                                    x86_64                               5.14.0-162.6.1.el9_1.0.1                               @anaconda                                 31 M
 kernel-modules                                    x86_64                               5.14.0-284.25.1.el9_2                                  @baseos                                   33 M
 kernel-modules-core                               x86_64                               5.14.0-284.25.1.el9_2                                  @baseos                                   31 M

Transaction Summary
==============================================================================================================================================================================================
Remove  9 Packages

Freed space: 357 M
Running transaction check
Transaction check succeeded.
Running transaction test
Transaction test succeeded.
Running transaction
  Preparing        :                                                                                                                                                                      1/1
  Erasing          : kernel-5.14.0-284.25.1.el9_2.x86_64                                                                                                                                  1/9
  Running scriptlet: kernel-5.14.0-284.25.1.el9_2.x86_64                                                                                                                                  1/9
  Erasing          : kernel-modules-5.14.0-284.25.1.el9_2.x86_64                                                                                                                          2/9
  Running scriptlet: kernel-modules-5.14.0-284.25.1.el9_2.x86_64                                                                                                                          2/9
  Erasing          : kernel-5.14.0-162.6.1.el9_1.0.1.x86_64                                                                                                                               3/9
  Running scriptlet: kernel-5.14.0-162.6.1.el9_1.0.1.x86_64                                                                                                                               3/9
  Erasing          : kernel-modules-5.14.0-162.6.1.el9_1.0.1.x86_64                                                                                                                       4/9
  Running scriptlet: kernel-modules-5.14.0-162.6.1.el9_1.0.1.x86_64                                                                                                                       4/9
  Erasing          : kernel-modules-core-5.14.0-284.25.1.el9_2.x86_64                                                                                                                     5/9
  Running scriptlet: kernel-modules-core-5.14.0-284.25.1.el9_2.x86_64                                                                                                                     5/9
  Running scriptlet: kernel-core-5.14.0-284.25.1.el9_2.x86_64                                                                                                                             6/9
  Erasing          : kernel-core-5.14.0-284.25.1.el9_2.x86_64                                                                                                                             6/9
warning: file /lib/modules/5.14.0-284.25.1.el9_2.x86_64/modules.builtin.modinfo: remove failed: No such file or directory
warning: file /lib/modules/5.14.0-284.25.1.el9_2.x86_64/modules.builtin: remove failed: No such file or directory

  Running scriptlet: kernel-core-5.14.0-284.25.1.el9_2.x86_64                                                                                                                             6/9
  Running scriptlet: kernel-core-5.14.0-162.6.1.el9_1.0.1.x86_64                                                                                                                          7/9
  Erasing          : kernel-core-5.14.0-162.6.1.el9_1.0.1.x86_64                                                                                                                          7/9
  Running scriptlet: kernel-core-5.14.0-162.6.1.el9_1.0.1.x86_64                                                                                                                          7/9
  Erasing          : kernel-devel-5.14.0-284.25.1.el9_2.x86_64                                                                                                                            8/9
  Erasing          : kernel-devel-5.14.0-162.6.1.el9_1.0.1.x86_64                                                                                                                         9/9
  Running scriptlet: kernel-devel-5.14.0-162.6.1.el9_1.0.1.x86_64                                                                                                                         9/9
  Verifying        : kernel-5.14.0-162.6.1.el9_1.0.1.x86_64                                                                                                                               1/9
  Verifying        : kernel-5.14.0-284.25.1.el9_2.x86_64                                                                                                                                  2/9
  Verifying        : kernel-core-5.14.0-162.6.1.el9_1.0.1.x86_64                                                                                                                          3/9
  Verifying        : kernel-core-5.14.0-284.25.1.el9_2.x86_64                                                                                                                             4/9
  Verifying        : kernel-devel-5.14.0-162.6.1.el9_1.0.1.x86_64                                                                                                                         5/9
  Verifying        : kernel-devel-5.14.0-284.25.1.el9_2.x86_64                                                                                                                            6/9
  Verifying        : kernel-modules-5.14.0-162.6.1.el9_1.0.1.x86_64                                                                                                                       7/9
  Verifying        : kernel-modules-5.14.0-284.25.1.el9_2.x86_64                                                                                                                          8/9
  Verifying        : kernel-modules-core-5.14.0-284.25.1.el9_2.x86_64                                                                                                                     9/9

Removed:
  kernel-5.14.0-162.6.1.el9_1.0.1.x86_64            kernel-5.14.0-284.25.1.el9_2.x86_64        kernel-core-5.14.0-162.6.1.el9_1.0.1.x86_64     kernel-core-5.14.0-284.25.1.el9_2.x86_64
  kernel-devel-5.14.0-162.6.1.el9_1.0.1.x86_64      kernel-devel-5.14.0-284.25.1.el9_2.x86_64  kernel-modules-5.14.0-162.6.1.el9_1.0.1.x86_64  kernel-modules-5.14.0-284.25.1.el9_2.x86_64
  kernel-modules-core-5.14.0-284.25.1.el9_2.x86_64

Complete!


Centos는 아래 링크 참조

https://www.runit.cloud/


2023년 11월 7일 화요일

[ABAP]_엑셀 다운로드시 매크로 관련 오류

 [ 출처 : https://answers.sap.com/ ]


As per SAP Note 3247649 , the certificate needs to be installed manually under Trusted Publishers by each user or can be done through group policies. In order to get the certificate you need to at least have any one specific user/system who can export the certificate from the templates present in attachment of SAP Note 1992004 and also make sure the steps are performed in system.


[ 출처 : https://help.sap.com/ ]

1 - SAP SE certificate

  • The SAP SE certificate is delivered with the front end installation.
  • You can find the SAP SE certificate here: 
      • MS Excel > Options > Trust Center > Trust Center Settings > Trusted Publishers
      • MS Internet Explorer > Internet Options > Content > Certificates > TAB Trusted Publishers
  • On the "General" tab , you can check the validity.
  • On the "Certification Path" tab ,the path should be displayed as shown in following screenshot and the message "This certificate is OK" should be shown:


2 - How to remove an expired SAP SE certificate?

  • Check folder C:\Program Files (x86)\SAP\Business Explorer\BI you can find the file BExAddin.dll. In the context menu for this file open the properties and switch to tab "Digital Signatures". You will find the SAP SE certificate. Press the button "Details" and then button "View Certificate" to see the validity of this certificate. As long any file has the "SAP SE certificate", irrelevant of the validity date, you can be assured that the file is a part of SAP certified software. The validity only shows the time period that SAP can use this certificate to certify a file. 


  • Now you can find the expired SAP public key in Internet Explorer, Microsoft Edge or Excel Options under Trusted Publisher. The key is updated according to the setting/rules/option maintained in operating system.
  • If the validity of this key is expired, you can remove the key following these steps: 
  1. Start Microsoft Edge
  2. Open More Tools > Internet Options > on TAB Content > press button Certificates.  
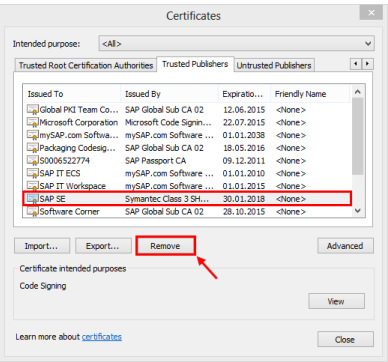
  3. Under Trusted Publisher select SAP SE certificate and press button Remove:

3 - How to import the SAP SE certificate manually?

If you cannot find the certificate or you want to replace an expired certificate perform these steps:

  1. In Microsoft Edge > More Tools > Internet Options > Advanced tab, activate the flag "Check for publisher's certificate revocation":

  2. In Excel > Trust Center make sure that the following properties are active:
    1. Add-ins:
      1. [x] Require Application Add-ins to be signed by Trusted Publisher:


    2. Macro Settings according note 1962327
      1. (o) Disable all macros except digitally signed macros
      2. [x] Trust access to the VBA project object model:


  3. Close Internet Explorer and Excel.
  4. RESTART THE WORKSTATION
  5. Confirm the settings are still there on Excel and proceed
  6. Open folder C:\Program Files (x86)\Common Files\SAP Shared\BW.
  7. Start BExAnalyzer.xla file.
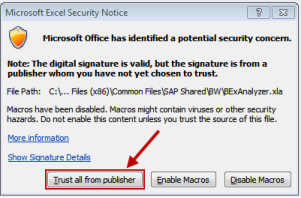
  8. MS Excel opens and a MS Excel Security PopUp asks for confirmation:


  9. Press button 'Trust all from publisher'. This imports the SAP SE certificate under the Trusted Publishers path.

Note:

  • Each certificate has a limited validity, it expires on a certain date. A new certificate with updated/extended validity is delivered with the BEx front end patch (see: Current BI ADDON for SAP GUI 760).
  • SAP releases the next patch before the old certificate expires, so you just have to install the newest patch to have a valid certificate.
  • If the root certificate 'VeriSign Class 3 Code Signing 2010 CA' has been expired, you will have to update it as described in note 711648.


4 - Certificates in workbooks

  • A new created workbook which is based on the SAP default workbook is signed and saved with the current installed certificate. So in the workbook a certificate exists with a limited validity.
  • When opening an old workbook containing an expired certificate you will receive a warning from Excel stating that the certificate with which the workbook was signed has expired. The warning messages state that the signature is invalid. It is not really a problem since it is just informing you about the status of the workbook. You can still work with the workbook.
  • When you save a workbook containing an expired digital certificate Excel automatically removes the invalid certificate from the workbook before saving it.

Note:

  • The SAP delivered SAP Default Workbook contains macros. For security reasons this workbook has to be digitally signed so that customers know that the workbook is from SAP and safe to use.
  • Workbooks which have been created by the customer do not necessarily require a signature. The customer determines if the workbook should be saved with a digital signature or not. If it is saved with a digital signature then the signature is typically the signature of the customer whom the workbook belongs to.

Here is how you can find the workbook certificate/signature:

  • Open the workbook > press Alt+F11 > in MS VB navigate: Tools > Digital Signature


SAP Note 711648 - Macro certificate signature not verified


[ 출처 : https://answers.microsoft.com/ ]


Macros from the internet will be blocked by default in Office: Block macros from running in Office files from the Internet

https://docs.microsoft.com/en-us/DeployOffice/security/internet-macros-blocked#block-macros-from-running-in-office-files-from-the-internet

매크로 보안 관련하여 기본 디자인이 최근에 바뀌었습니다. 여기서 이 레지스트리가 ‘구성되지 않음’ 상태일 경우 원래는 Office 앱의 보안 센터 설정을 따라가는 것이 기본 디자인이었으나, 이제는 ‘구성되지 않음’ 상태인 경우에도 Office 앱의 보안 설정과 상관없이 차단하는 것으로 디자인이 바뀐 것으로 보입니다.

Windows Registry Editor Version 5.00


[HKEY_CURRENT_USER\SOFTWARE\Policies\Microsoft\office\16.0\excel\security]

"blockcontentexecutionfrominternet"=dword:00000000


위 내용을 그대로 복사하여 메모장에 붙여넣고, .reg 파일로 저장한 뒤 실행하여 병합합니다.

(메모장에서 저장시 '파일 형식'을 모든 파일로 지정하고 파일 이름 뒤 .reg를 붙이면됩니다)


이후 재부팅한 뒤, 매크로 파일을 열어보는 작업을 진행해 보시기 바랍니다.


이 레지스트리는 인터넷에서 다운로드된 오피스 파일에 포함된 매크로를 차단하는 것을 명시적으로 사용하지 않게 설정합니다.


이렇게 하면 Office 프로그램이 Excel 보안 센터의 매크로 설정을 따르게끔 조치할 수 있을 것으로 보입니다.


또한 매크로 설정을 위와 같이 매크로를 사용하는 쪽으로 모두 변경해 주셔야 할 수 있습니다.


인터넷에서 다운로드 된 파일에 포함된 매크로는 기본적으로 차단되는 것이 Microsoft의 권장 사항이며, 아무 조건 없이 실행시키도록 구성하는 것은 컴퓨터 보안 측면에서 위험할 수도 있습니다.

Microsoft Community를 이용해주셔서 감사합니다.

안내 드린 답변이 도움이 되었기를 바라며, 문제가 해결되지 않았거나 추가 질문이 있으실 경우

[응답] 버튼을 눌러 답변 부탁드립니다.

감사합니다.


2023년 10월 20일 금요일

[Linux]_VSFTP 로그 파일 포맷

 [ 출처 : https://docs.oracle.com/ ]


The xferlog file contains transfer logging information from the FTP Server, in.ftpd(1M). You can use the logfile capability to change the location of the log file. See ftpaccess(4).

Each server entry is composed of a single line of the following form. All fields are separated by spaces.

current-time  transfer-time    remote-host  file-size  filename  
transfer-type  special-action-flag  direction access-mode  username
service-name  authentication-method  authenticated-user-id completion-status

The fields are defined as follows:

current-time

    The current local time in the form DDD MMM dd hh:mm:ss YYYY, where:

    DDD    :    Is the day of the week
    MMM   :    Is the month
    dd        :    Is the day of the month
    hh        :     Is the hour
    mm      :     Is the minutes
    ss        :     Is the seconds
    YYYY   :     Is the year

transfer-time
    The total time in seconds for the transfer

remote-host
    The remote host name

file-size
    The number of bytes transferred

filename
    The name of the transferred file

transfer-type
    A single character indicating the type of transfer:
    a   :     Indicates an ascii transfer
    b   :     Indicates a binary transfer

special-action-flag
    One or more single character flags that indicate any special action taken. The special-action-flag can have one of more of the following values:
    C   :    File was compressed
    U   :    File was uncompressed
    T   :    File was archived, for example, by using tar(1)

    _ (underbar)
        No action was taken.

direction
    The direction of the transfer. direction can have one of the following values:
    o   :   Outgoing
    i    :    Incoming

access-mode
    The method by which the user is logged in. access-mode can have one of the following values:
    a   :    For an anonymous user.
    g   :    For a passworded guest user. See the description of the guestgroup capability in ftpaccess(4).
    r   :     For a real, locally authenticated user

username
    The local username, or if anonymous, the ID string given

service-name
    The name of the service invoked, usually ftp

authentication-method
    The method of authentication used. authentication-method can have one of the following values:
    0   :    None
    1   :    RFC 931 authentication

authenticated-user-id
    The user ID returned by the authentication method. A * is used if an authenticated user ID is not available.

completion-status
    A single character indicating the status of the transfer. completion-status can have one of the following values:
    c   :     Indicates complete transfer
    i    :     Indicates incomplete transfer


2023년 10월 19일 목요일

[Linux] fail2ban에서 차단된 IP 해제

 [ 출처 : https://blog.naver.com/]

# fail2ban-client postfix

 Status for the jail: postfix
|- Filter
|  |- Currently failed: 4
|  |- Total failed:     7
|  `- File list:        /var/log/maillog
`- Actions
   |- Currently banned: 0
   |- Total banned:     1
   `- Banned IP list: 121.xxx.xxx.x

로그에서 차단된 IP를 확인

# cat /var/log/fail2ban.log* | grep "] Ban"|awk '{print $NF}' | sort | uniq -c | sort -n

차단된 IP를 해제
# fail2ban-client set postfix unbanip 121.xxx.xxx.x

2023년 8월 17일 목요일

[Linux] Postfix 설정 관련 내용

 [ 출처 : https://ablog.jc-lab.net/ ]

설정상에 표시되는 내용 정리


permit_mynetworks : mynetworks에 정의된 네트워트로 들어오는 요청에 대하여 허용

permit_sasl_authenticated : sasl(아이디/비번) 인증된 사용자 허용

reject_sender_login_mismath : 보내는이(from Id)와 sasl 인증 사용자 다르면 거부

reject_non_fqdn_helo_hostname : 도메인 이름이 정규화된 이름 또는 리터럴 형식이 아닐 경우 거부(smtpd_helo_required=yes설정 필요)

reject_unknown_helo_hostname : 존재하지 않는 도메인(DNS A or MX)에서 보내온 메일은 거부

reject_unknown_hostname : 자신의 hostname을 모르는 메일 시스템은 거부

reject_unknown_sender_domain : 존재하지 않는 도메인 메일은 거부

reject _unauth_pipelining : pipelining 명령을 못 알아듯는 클라이언트 차단


2023년 6월 29일 목요일

[Linux]_네트워크 관리


[ 출처 : https://tpcable.co.kr/ , https://www.lesstif.com/ ]

네트워크 조회

# nmcli con show


네트워크 설정

# nmcli con mod "System eth0" ipv4.address 192.0.2.2/24 ipv4.gateway 192.0.2.254 ipv4.dns "8.8.8.8 168.126.63.1"

DHCP 활성화

# nmcli device modify "System eth0" ipv4.method auto

부팅시 자동 활성화

# nmcli con mod "System eth0" connection.autoconnect yes

 네트워크 재부팅

# systemctl restart NetworkManager.service 

디바이스 상태 확인(아이피 부여된 상태 전체 조회)

#nmcli device show

네트워크 온오프(유선/무선)

# nmcli net on/off      nmcli radio wifi on/off

네트워크 활성화

# nmcli connection up


[Linux] Rocky VM 명령어

 [ 출처 : https://techviewleo.com/ ]


리눅스 기존 가상 프로그램을 SSH상에서 조회 및 제어하는 방법임.

# virsh list --all


#Start VM
  virsh start VM_name

#Stop VM
  virsh stop VM_name

#Save current state of running VM
  virsh save VM_name VM_name_save

#Restore saved VM
  virsh restore VM_name_save

#Reboot
  virsh reboot VM_name

#Pause/Suspend VM
  virsh suspend VM_name

#Resume Suspended VM
 virsh resume VM_name

#Shutdown
  virsh shutdown VM_name

#Expunge
 virsh destroy VM_name

2023년 6월 7일 수요일

[ORACLE] 아카이빙 모드 확인 하는법

아래 명령어로 아카이빙 모드 확인 및 대상 파일 위치 확인 가능함.

C:\Users\Administrator>sqlplus "/as sysdba"

SQL*Plus: Release 11.2.0.4.0 Production on Wed Jun 7 08:10:54 2023

Copyright (c) 1982, 2013, Oracle.  All rights reserved.


Connected to:
Oracle Database 11g Enterprise Edition Release 11.2.0.4.0 - 64bit Production
With the Partitioning, OLAP, Data Mining and Real Application Testing options

SQL> archive log list;
Database log mode              Archive Mode
Automatic archival             Enabled
Archive destination            D:\archive
Oldest online log sequence     31974
Next log sequence to archive   31976
Current log sequence           31976

2023년 4월 13일 목요일

[Linux] XRDP로 접속 후 프로그램 실행 오류 발생

 [ 출처 : https://github.com/ ]


xrdp로 접속 후 프로그램 실행시 cannot open display 1 오류 발생

# systemctl set-default multi-user.target
# reboot


2023년 4월 10일 월요일

[ABAP] RFC Destination 사용법(SAP RFC에서 외부 시스템 호출)

[ 원글 : https://blog.naver.com/dhysys/ ]


.NET [ https://blog.naver.com/dhysys/

http://help.sap.com 에서는 다음과 같이 나와있습니다.

In the SAP System, the ability to call remote functions is provided by the Remote Function Call (RFC) interface. This interface allows for remote calls between two SAP Systems (R/3 as of Release 2.1 and R/2 as of Release 5.0D), or between an SAP System and a non-SAP system.


server와 client에 대해서는..

RFC programs for non-SAP Systems can function as either the caller or the called program in an RFC communication.

There are two kinds of RFC programs: RFC client and RFC server programs:
The RFC client is the instance that calls up the RFC to execute the function which is provided by an RFC server. In the following, the functions that can be executed remotely will be called RFC functions, and the functions provided by the RFC API will be called RFC calls.


그렇다면! RFC Server를 이용하여 SAP 의 이벤트를 받고 싶다면 어떻게 하는지 알아보겠습니다.


시스템 구성

Windows Server 2003 Enterprise Edition with SP2

Visual Studio 2003

SAP .NET Connector 1.03

JAVA VM Version 5 Runtime engine


** SAP .NET Connecotr는 Visual Studio 2003, .NET Framework 1.1까지만 지원하고 있습니다. 더 이상 SAP에서는 SAP .NET Connector를 지원하지 않겠다고 합니다. 그 이상 버전에서 사용하고 싶으시면 WCF SAP Adapter를 이용하셔야 합니다.


사전 작업

SAP RFC Destination 설정과 RFC 함수 구현이 완료되어 있어야 됩니다.


실제 구현

SAP .NET Connector에는 RunTime과 Design Time으로 분리되며, Visual Studio 2003을 지원하기 위해서는 반드시 Design Time이 설치되어야 합니다. 설치 된 후 Visual Studio 2003에서 프로젝트를 추가 후 -> 새로운 항목 추가를 클릭하면 SAP Connector Class라는 항목을 확인할 수 있습니다.


SAP Connector Class를 선택 Name을 지정 후 Open을 클릭하면 SAP .NET Connector Wizard가 실행됩니다.


SAP Server를 선택 후 Next를 클릭합니다.


SAP 서버의 연결정보를 구성 후 Object TypeServer Stub으로 선택 후 Next를 클릭합니다.


RFC함수를 검색하여 ADD시킨 후 Next를 클릭합니다.


C#코드가 자동생성되는것을 확인할 수 있습니다.


Stub코드가 생성 된 후 Windows서버에서 SAP 이벤트를 수신받기 위해 Listener를 구성하여야 합니다. 일반적으로는 윈도우즈 서비스로 구성합니다.


프로젝트가 구성되었습니다.

프로젝트 구성이 완료되었으니 실제 소스를 구현합니다. 여기서는 콘솔 프로그램으로 작성하였습니다.


using문에 SAP.Connector를 추가합니다. (Wizard를 통해 Stub코드를 생성할때 SAP.Connector.dll은 자동 참조 됩니다.)


RFCServerConsole을 상속받아 구현하였습니다.


콘솔프로그램의 구현은 간단합니다. SAP의 Detination정보를 가지고 서비스를 대기하는 Listener입니다.

SAP에서 이벤트를 수신받았을때 수행되는 함수입니다. Wziard로 Stub을 생성 후 override하여 구현하면 됩니다.

여기서는 간단하게 X, Y값을 덧셈하는 로직입니다.


RFC Server와 (1) SAP .NET Connector C# Side에서 구성한 Listener와의 통신 접점 구성을 해주어야 합니다.

이 구성을 SAP는 RFC Destination을 생성한다고 합니다.

help.sap.com 참조: RFC Destination


트랜잭션 코드는 SM59입니다.


 Display and maintain RFC destinations 화면에서 "Create"버튼을 클릭하면 RFC Destination을 생성하는 화면이 나옵니다.


 Connection Type은 "T"를 선택합니다. 여기서 "T"는 TCP/IP 통신을 하겠다는 의미입니다.


 "Registration" 버튼을 클릭한 후 ProgramID를 구분할수 있는 값으로 지정합니다. 여기서는 "BIZTALK"으로 지정하였습니다.


 ProgramID를 지정후 툴바의 플로피 디스크 아이콘 (Save)을 클릭하여 저장합니다.


 BIZTALK이라는 이름으로 RFC Destination이 생성된것을 확인할 수 있습니다.


 RFC Destination이 생성되면 외부 시스템과의 통신이 원활하게 이루어지는지 테스트를 해보게 됩니다.

이때 SAP.NET Connector의 경우는 Console프로그램을 실행시켜 Listen을 하고 있는 상태이어야 합니다.

BizTalk SAP Adapter의 경우는 Receive Port를 생성하여 Enable 상태이어야 합니다.


 "Test Connection"을 클릭하였을때 정상적으로 서비스가 Listen 상태라면 통신이 원활하게 되고 있다는것을 확인하실수 있습니다.

연결 테스트가 되었다면 이제 RFC함수로가서 정상적으로 동작하는지 확인합니다.


RFC 개발화면 트랜잭션코드는 SE37입니다.


 여기서는 미리 생성한 RFC "Z_RFC_ADD"를 사용하도록 합니다.


 RFC함수의 내용은 보시는것 처럼 값(VALUE)를 전달하는 역할만 합니다.

툴바의 "Test or Execution" 아이콘을 클릭합니다.


 간단한 덧셈을 하는 내용입니다. 실제 덧셈을 하는 로직은 SAP.NET Connector로 구현한 Console 프로그램이나 BizTalk Server에서 구성된 로직이 되겠습니다. RFC함수는 값만 전달해주고 결과값을 돌려받습니다.


여기서 중요한것은 SAP에서 이벤트가 시작하여 그것이 외부시스템에서 수행 후 그 결과값을 받을 수 있다는것입니다.


간단한 값을 지정하고 어느 Destination을 통해 통신하는지를 지정 후 "Execute"를 클릭합니다.


 외부 시스템 서비스와 Destination 연결테스트가 정상적이며, 외부 서비스의 로직 구현이 정상이라면 결과물을 화면과 같이 받아 볼 수 있습니다.


(2) RFC Server SAP Side에서 구성한 RFC를 그대로 사용하도록 하겠습니다. 내용은 단순하게 덧셈을 하는것으로 잡았으며, MiniSAP이므로 실제 SAP와는 조금 차이 날 수 있습니다.


 SAP에서 RFC 구성이 완료되었으면 BizTalk Server측으로 넘어가도록 합니다.

BizTalk WCF SAP Adapter가 정상적으로 설치되었다면, Visual Studio를 실행하여 BizTalk 프로젝트를 생성합니다.

BizTalk 프로젝트에서 오른쪽 마우스 버튼을 클릭 Add -> Add Generated Items를 선택합니다.


Add Generated Items의 왼쪽 트리뷰에서 Consume Adapter Service을 선택합니다.


WCF Adapter Wizard화면이 나오면 BindingSAP로 지정합니다.

SAP로 지정 후 접근할 SAP의 주소 및 인증정보를 입력합니다.


SAP 접근 인증정보 입력


SAP 서버 정보 입력


설정이 완료된 후 Connect를 클릭하면 SAP 서버정보가 보입니다.


 Contract type Client로 지정 후 검색 또는 왼쪽 트리에서 필요한 RFC를 찾아서 추가합니다. OK를 클릭하면 Z_RFC_ADD 함수의 스키마가 생성됩니다.


RFC Server 방식은 수신 받은 이벤트를 가지고 로직을 실행 후 리턴값을 응답하는 구조입니다.

여기서는 Orchestration을 생성하여 C#으로 구성된 모듈(로직)을 호출하여 응답값을 리턴하도록 합니다.


 Expression Shape를 사용하여 C# 모듈을 호출합니다.

응답값을 리턴하기 위해서는 WCF.Action값이 필요합니다. Action값은 Schema에서 확인할 수 있습니다.


C# 모듈은 간단한 덧셈을 수행 후 Response Schema에 맞는 XML을 생성합니다.

BizTalk 프로젝트가 생성이 완료되면 빌드하여 배포하도록 합니다.


이제 RFC Server 이벤트를 수신받을 Receive Port를 생성합니다.


RFC Server의 방식은 수신을 받은 후 응답을 주는 형태이므로 Request Response Recieve Port로 생성합니다.


포트이름은 알아볼수 있는 내용으로 지정하시면 됩니다.


 Receive Location에서 Type은 WCF-Custom으로 선택합니다.

Handler를 선택 후 파이프라인은 Default XML 파이프라인으로 지정합니다.

Configure...을 클릭합니다.


WCF-Custom 어댑터 설정화면이 나오면 Binding 탭에서 SAPBinding을 선택합니다.


SAP 서버에 접근하는 인증정보를 입력합니다.

General 탭으로 다시 돌아와서 Address를 입력합니다. 앞서서 SAP Counsum Wizard에서 생성한 Address를 사용해보았는데 연결이 되지 않습니다. 사용자가 수정을 해야합니다.


주소는 다음과 같은 포멧으로 만들어주면 됩니다.

sap://CLIENT=00;LANG=EN;@A/MINISAP/00?ListenerGwHost=MINISAP&ListenerGwServ=SAPGW00&ListenerProgramId=BIZTALK


설정이 완료 된 후 Receive PortEnable 상태로 변경합니다.


(2) RFC Server SAP Side에서 했던 Connection Test를 해서 연결이 올바르게 이루어지는지 확인합니다.


 Connection Test가 완료되었다면, 이제 실제로 SAP 에서 이벤트를 주어 RFC Server가 동작하는지 테스트 해보도록 합니다.


BizTalk Server와 관련해서 WCF Adapter 샘플을 제공하고 있습니다. 샘플은 다음링크에서 다운로드 받을 수 있습니다.

BizTalk Server 2006 R2 Code Samples

여기서 사용한 샘플 역시 여기서 다운로드 받아 약간의 수정을 통해 이용하였습니다.


WCF SAP Adapter을 테스트 하면서 생각되어진 장단점은 다음과 같습니다.


장점

(1) 이전 BizTalk Adapter로는 지원되지 않는 부분들을 지원하고 있습니다.

- RFC Server 지원

- SAP ECC Version 지원


(2) 마이크로소프트에서 돈?을 받고 파는 제품이기 때문에 문제 발생시 기술지원을 받을 수 있습니다.


(3) 마이크로소프트에서 만들어 내기 때문에 앞으로도 꾸준히 업데이트 되면서 BizTalk 이외의 다른제품에서도 사용할 수 있도록 나오게 되었습니다 . SSIS (SQL Server Integration Service), IIS (Internet Information Service), MOSS (Microsoft Office Share Point Server), W/S (XML Web Service) 등등


단점

(1) 현재 나와있는 BizTalk WCF Adapter v1.0은 버그가 보이고 있습니다. SAP를 연결하는데 같은 버전의 SAP라도 오류가 그때그때 달라지니.. 좀 난감할때가 있습니다. 아무래도 첫번째 버전의 모습을 보이고 있지만, 내년에 v2.0 으로 몇가지 어댑터와 추가기능이 추가되어서 나오면 좀더 사용할만한 어댑터가 되지 않을까 싶습니다.


(2) BizTalk Adapter로는 BizTalk으로 구매시 라이센스가 같이 들어오지만 BizTalk이 없이 사용할려고 할때에는 라이센스를 구매하셔야 합니다. SAP와 연계는 하고 싶지만 BizTalk은 너무 비싸서 구매에 망설여 진다면 WCF Adapter Pack만 구매해서 사용하시는것도 방법입니다.


(3) 설치시 몇까지 지켜줘야 될 사항들이 있습니다. SAP GUI에서 dll 복사 설치라던가.. 아직까지는 원 클릭 설치가 되지 않습니다. SAP GUI 버전도 좀 가리는것 같습니다.


(4) 여러번 Consume Adapter Wizard를 실행할 경우가 생기면 매번 인증정보와 서버정보를 입력해야 합니다. 이거 매우 반복성 작업이 되어버리는군요... 서버정보는 Configure a URI를 복사해서 사용하면 약간이나마 줄일 수 있습니다.